What are Crest Whitening Strips with Light?
Crest Whitening Strips with Light are a popular at-home teeth whitening solution designed to brighten your smile. These strips combine the power of hydrogen peroxide whitening agents with a blue light device to enhance the whitening process. The strips adhere to your teeth, delivering the whitening ingredients, while the light accelerates the stain removal. This combination promises faster and more effective results compared to using the strips alone. They are convenient, easy to use, and offer a relatively affordable way to achieve a brighter, whiter smile in the comfort of your home. Understanding the product’s functionality is the first step to achieving the desired results.
Benefits of Using Crest Whitening Strips
Crest Whitening Strips with Light offer several benefits that make them a favored choice for teeth whitening. Primarily, they are incredibly convenient, allowing you to whiten your teeth at home without visiting a dentist. The strips are also relatively affordable compared to professional whitening treatments. Moreover, the results are often noticeable within days, providing a quick improvement in the appearance of your smile. The inclusion of the light technology enhances the whitening process, potentially leading to more dramatic results. Consistent use, as directed, can significantly reduce stains and discoloration caused by coffee, tea, wine, and aging, boosting your confidence with a brighter, whiter smile. These benefits make Crest Whitening Strips a practical and accessible option for many.
How to Prepare Before Using the Strips

Preparing properly before using Crest Whitening Strips is crucial for optimal results. Begin by brushing your teeth gently to remove any surface debris. However, avoid brushing immediately before applying the strips, as this could irritate your gums. Instead, brush about 30 minutes before or after. Ensure your teeth are dry by gently patting them with a clean cloth or tissue. This helps the strips adhere better to your teeth. Also, it’s a good idea to have a mirror and a timer or a clock nearby to monitor the application time. Read the instructions on the package thoroughly to understand the specific steps and duration for your chosen product. Finally, inspect your teeth to identify any existing fillings, crowns, or veneers, as the strips will not whiten these. Being prepared ensures the best possible outcome and minimizes any potential issues.
Step-by-Step Instructions for Using Crest Whitening Strips
Follow these steps to use Crest Whitening Strips with Light effectively. Adhering to these instructions will help you maximize the whitening results while minimizing any potential risks or discomfort. Each step is designed to ensure the strips are applied correctly and the light technology is utilized effectively for a brighter smile.
Step 1 Open the Package
Open the Crest Whitening Strips package. Inside, you will find individual pouches containing the upper and lower strips. Carefully tear open one pouch. Ensure that your hands are clean and dry before handling the strips to prevent contamination. Take out the strips and identify the upper and lower strips. The upper strip is typically longer to cover the front teeth more effectively. Having everything ready before application will make the process smoother and more efficient.
Step 2 Apply the Strips

Apply the upper strip first by peeling it away from the backing. Look in a mirror, and apply the sticky side of the strip to your upper teeth. Align the strip with your gumline, pressing gently to ensure full contact. Fold the excess strip over the back of your teeth to secure it. Repeat this process with the lower strip, aligning it with your lower gumline. Make sure the strips cover your front teeth evenly. Avoid touching your gums excessively to minimize potential irritation. Ensure that the strips are adhered properly, and you feel a secure fit for optimal performance.
Step 3 Turn on the Light
Once the strips are applied, take the blue light device that comes with your Crest Whitening Strips. Turn the light on, following the specific instructions provided with your kit. Usually, this involves pressing a button or activating the device in some manner. Position the light so that it shines directly onto your teeth, ensuring it covers all the strips. The light enhances the whitening process by activating the whitening agents in the strips. Make sure the light is comfortably in place throughout the treatment duration specified by the instructions.
Step 4 Wait for the Time
Follow the recommended treatment time indicated on the Crest Whitening Strips package. This time period is crucial for the whitening agents to effectively lift stains from your teeth. Generally, this can range from 30 minutes to an hour, but always adhere to the specific guidelines provided. Avoid eating, drinking, or smoking during this period to prevent any interference with the whitening process. Use a timer to keep track of the time, and be patient. The combination of the strips and light requires the allotted time for effective whitening.
Step 5 Remove the Strips

Once the treatment time is complete, carefully remove both the upper and lower strips from your teeth. Gently peel them away from your teeth, starting from the back and working your way forward. Dispose of the used strips properly. Be careful not to pull too hard, which could cause discomfort or damage your gums. If there is any remaining residue, gently wipe your teeth with a clean cloth or brush lightly to remove it. Remove any leftover adhesive for comfort and to prepare your mouth for the next step.
Step 6 Rinse your Mouth
After removing the strips, rinse your mouth thoroughly with water. This will help remove any remaining whitening gel or residue. Avoid using mouthwash immediately after whitening, as some mouthwashes can contain ingredients that may interfere with the whitening process. Instead, simply rinse with water to ensure all remnants are gone. This step is vital to clean your mouth and to minimize any possible sensitivity after the treatment.
Step 7 Enjoy Your Smile
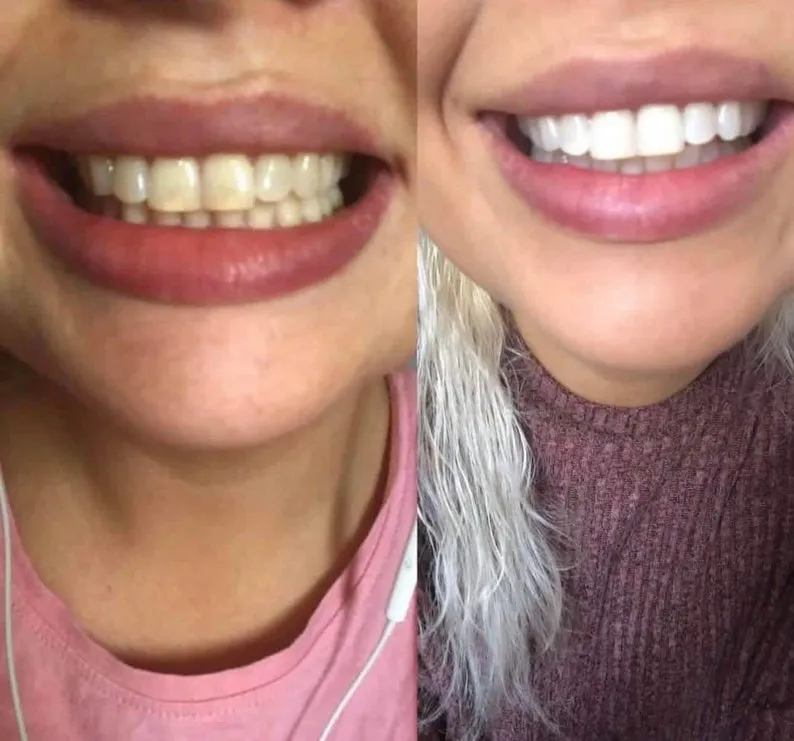
After rinsing your mouth, take a moment to admire your brighter, whiter smile. Note the difference in the shade of your teeth. The results are often visible shortly after the first use, and they typically improve with consistent use. Continue following the instructions for the recommended duration to achieve your desired level of whitening. Remember that results may vary depending on the initial state of your teeth. Enjoy your confident new smile and feel great about your fresh, clean look.
Tips for Maximizing Whitening Results

To maximize the effectiveness of Crest Whitening Strips with Light, consider these tips. Avoid consuming stain-causing foods and drinks such as coffee, tea, red wine, and dark-colored sodas during the whitening process. Maintain a good oral hygiene routine by brushing your teeth twice a day and flossing daily. This helps remove surface stains and plaque, which can hinder the whitening process. Use a whitening toothpaste to maintain your results and prevent new stains. Also, use the strips regularly as directed on the package for optimal results. Be patient, and stick to the recommended treatment plan for the best outcome. Implementing these strategies will help you achieve and maintain a brighter smile.
Troubleshooting Common Issues
Occasionally, users might encounter issues when using Crest Whitening Strips. One of the most common side effects is tooth sensitivity. If this occurs, take a break from using the strips and consider using a toothpaste designed for sensitive teeth. Gum irritation is another potential issue, which can often be avoided by ensuring the strips are not in direct contact with your gums. If irritation occurs, consult your dentist. Uneven whitening can happen if the strips aren’t applied correctly; ensure even coverage for all teeth. If the light device isn’t working, check the batteries and ensure it’s properly positioned. If the results don’t meet your expectations, make sure you’re following all instructions, and consider consulting your dentist for professional advice if needed. Understanding these potential issues will help ensure you’re well prepared.
Maintaining Your Bright Smile
After achieving your desired level of whiteness with Crest Whitening Strips, maintaining your bright smile requires consistent care. Continue practicing good oral hygiene by brushing and flossing regularly. Minimize consumption of stain-causing foods and drinks, such as coffee, tea, and red wine. Consider using a whitening toothpaste to help remove surface stains and maintain your results. Schedule regular dental check-ups and cleanings to keep your teeth healthy and bright. If you notice any new stains, you can use the whitening strips for a touch-up treatment, following the instructions. These steps will help ensure that your smile stays bright and beautiful long after the initial whitening treatment.
Where to Buy Crest Whitening Strips

Crest Whitening Strips with Light are widely available. You can purchase them at most major drugstores and pharmacies, such as CVS, Walgreens, and Rite Aid. Supermarkets like Walmart, Target, and Kroger also carry these products. For online purchases, you can find them on websites like Amazon and the official Crest website. Prices may vary, so it’s advisable to compare prices at different retailers before making a purchase. Ensure you’re buying from a reputable seller to guarantee the authenticity of the product. Consider reading reviews before purchasing to find the best options and ensure you are getting a genuine product.